Wednesday, September 19, 2018

Recipe for One pot spaghetti


Here is a good, basic one pot spaghetti recipe that will feed a family. Round out the meal with some toasted bread or rolls. 

All-in-one spaghetti

1 lb. ground beef
optional – 1 lg. diced onion
optional – 2 garlic cloves
-- or – wor. sauce, soy sauce, white wine vinegar, rice wine vinegar
8 oz. tomato sauce
6 oz. tomato paste
24 oz. tomato juice
1 c. water
1 t. salt
1 t. sugar
2-3 t. chili powder
1 t. dried oregano
dash of pepper
7 oz. spaghetti, uncooked
grated parmesan cheese

Brown ground beef in a large skillet or stockpot, with onions, garlic, and optional sauces. Drain or dip off grease. Stir in tomato sauce, tomato paste tomato juice, water, salt, sugar, chili powder, oregano, pepper. Simmer, stirring occasionally, for 30-45 minutes. Add pasta, and cook an additional 20 minutes or so until pasta is tender. Serve with grated parmesan cheese.

Tuesday, June 12, 2018

All purpose beef

Here's another recipe to share with you all from my personal collection. This one is of my own creation. It's for a general purpose beef that can be used in a variety of ways.


All purpose beef

2 lbs. ground beef
generous dash of salt
generous dash of pepper
optional – dash of soy sauce
optional – dash of worcestershire sauce
optional – dash of white wine or rice wine vinegar

Brown beef with all seasonings and sauces, then dip off the grease. Be sure to stir while browning to break up the beef.
Next, add:

1 can tomato soup
1 can diced tomatoes
3 T ketchup
3 t. mustard
optional – your choice of your favorite spices

Simmer for 30-45 minutes on low heat, stirring often.
Can be served over buns as sloppy joes, over rice or pasta, or however you choose. Add beans and you can have chili.

Wednesday, April 25, 2018

My recipe for Pork and Beef Stir-fry

This is an original recipe of mine, that I made up myself. Some of the measurements are approximate because I am mostly a pitch and pour cook. It's a pork and beef stir fry.
Note - If you have other meats that you like better, you can substitute those for the pork and beef.


Pork and beef stir fry

1 lb. boneless pork chops
1 lb. beef, sirloin or bottom round steak
soy sauce
worcestershire sauce

Cut meats into bite-size pieces. Put oil in a deep skillet, add meat, and season to suit with sauces. Cook till done through and no longer pink. Then add:

1 lb. package frozen mixed vegetables

And dashes of the following seasonings. Add more of the ones you like, less or omit the ones you don’t, feel free to substitute your own favorites.

curry powder
ground ginger
chili powder
paprika
salt
pepper

Simmer till done and veggies are thawed out and cooked, approximately 20-30 minutes.  

Monday, March 12, 2018

Tomato gravy, and going through recipes

I've embarked on a rather adventurous project - that of going through my index card boxes of recipes and putting them into my computer. I've decided to sort through them, keep the ones I want, and discard the rest; thus freeing the index card boxes up for other uses. 

My first step is to google the recipe title and check if I can find it online. If I can, through the chrome browser, I can choose to print it and save it as a pdf. If not, then I am typing it in as a word file. 

This will not be a simple project as I have about 3 boxes full of cards to go through. But so far, I'm enjoying it. And here's one of the first ones I typed in, a recipe for tomato gravy. 

Tomato gravy

2 T. butter or margarine
2 T. minced shallots
1 - 14-1/2 ounce can of diced tomatoes, undrained
1/2 cup whipping cream
1 t. chicken bouillon granules
1/2 t. sugar
1/4 t. pepper

Melt butter in a large skillet over medium heat; add shallots, and sauté until tender. Stir in tomatoes; bring to boil. Reduce heat; simmer, stirring constantly, 2-3 minutes. Stir in whipping cream and remaining ingredients; simmer, stirring often, 3 minutes or until thickened. Serve with pasta, potatoes, or veal. Yield: 2 cups. Prep: 5 minutes. Cook: 5 minutes.

Monday, November 13, 2017

A holiday classic - Mama's pecan pie

Mama, Daddy, and me,
high school graduation
One thing that was a holiday classic for me growing up, was Mama's pecan pies. She always made 2, because one would have never been enough.

You know how a cook will have some signature dishes? Well, my mama had hers, and her pecan pies were one of them.

During this holiday season, here in the blog, I'd like to share some of my holiday favorite recipes with you all; and I thought that there was no better place to start than my mama's pecan pie.

So, without further adieu, on to the recipe:

Freda's Pecan Pie

3 eggs
1/2 c. brown sugar
4 T. melted margarine
1 c. dark corn syrup
1 t. vanilla
1/8 t. salt
1 c. pecans, chopped
1 - 9 inch pie shell, unbaked

Beat eggs and add sugar gradually.  Mix in remaining ingredients.  Pour into pie shell and bake at 375 degrees for 45-50 minutes.

Friday, November 3, 2017

Review - Baby Dove Sensitive Moisture Tip to Toe Wash

Today I'm reviewing
Baby Dove Sensitive Moisture Tip to Toe Wash
Website link - https://www.dove.com/us/en/baby/washing-and-bathing/baby-body-wash/sensitive-moisture-tip-to-toe-wash.html

This product gets -
5 big fat glowing stars,
and deserves every one.

Well, if you read my first product review that I did for this blog, under it's new expanded range, you are acquainted with my search for a new liquid hand soap that is fragrance free.

Let me tell you, finding fragrance free products to use isn't always so easy, and sometimes you have to get quite creative. In the hand soap department, my local walmart didn't carry any fragrance free hand soap; and the dial type soaps didn't work for me either, I tried them. So, I got the idea to check in the baby section of the store. Believe me, it was a last ditch desperate idea. But it proved to be my best idea yet!

In the baby section of my store, I found the above product, Dove Baby tip to toe wash, and it was totally FRAGRANCE FREE! Yay! So I got myself a bottle. It costs about $6 something for a bottle at our local walmart, but it is a generous sized bottle. And it works so well too! Lathers up nicely, doesn't dry your hands out, doesn't take a lot; and totally fragrance free too.

Summing it up - I highly recommend this soap product for anyone who has sensitive skin and needs a good fragrance free liquid soap. It could be used in the shower or at the sink as hand soap, and it comes in a nice pump bottle. Plus, it is a good value for the price too.

Review - Clearly Natural Unscented Liquid Hand Soap

NEW!
This is the first of a new addition to this blog.
Product  reviews.
---------------------------------------------

Clearly Natural Unscented Liquid Hand soap
https://www.amazon.com/gp/product/B00FU1ZAJK/
$14.99 for a pack of 3, plus s&h

This product gets - 3 stars

I have very sensitive skin, and have been fragrance free for many years now. For a long time, I used the Ivory liquid hand soap; for while it had a fragrance according to the ingredients, it was one I could tolerate. But one day they quit making the Ivory hand soap, so then begin my search for a replacement before I ran out of the other.

This was the first of my attempts to find something. And it is unscented. I ordered it from Amazon, as I couldn't find anything in the stores around where I live that fit my needs. Some reviews had commented about the condition of the product when they received it, but mine were just fine, in excellent condition.

My complaint against this product is that it is glycerine liquid soap, and it doesn't lather worth patootie. I'm still using it up, mixed it with what was left of my Ivory soap.

In conclusion - not a product I would recommend.

Tuesday, July 4, 2017

Recipe - Granny's butter pie

I was just scrolling through my posts for this blog and realized that I'd never shared with you my Grandmother's recipe for butter pie. We all called her Granny, and here she is:


She was a wonderful woman who I have extremely fond memories of. She knew I loved this pie, and we spent every Sunday evening after church at her house. We'd go to church at New Harmony Baptist Church with my grandmother and a lot of my family. Then we'd go to her house for lunch. We'd take clothes to change into, and spend the afternoon there. Her house was awesome:


It was a wonderful place to spend a Sunday afternoon. And she almost always made a butter pie because she knew I loved them so. 

For a good long while, there wasn't a written recipe for the butter pie; then my aunt's homemaker group put out a cookbook, and wanted her pie recipe in it. So, one of my cousins went down there one day and measured as she made one of her butter pies; and so we had a recipe. Now, I share it with you. Note that if you don't cook the filling part just right, sometimes it won't want to set up. Even my grandmother had that happen to her. But don't let it phase you, it still tastes good. Also, you will need a double boiler for this recipe.

Now, on to the recipe.

Granny's Butter Pie

1 to 1-1/2 cups water
1/2 to 1 stick margarine
1 cup sugar
1 t. vanilla
3 heaping T. flour
1 baked pie shell

In a double boiler, add the water and margarine; and cook, stirring frequently, until margarine is melted. Then add sugar, and stir until sugar is dissolved.  Then add the vanilla, and stir. Next add the flour, 1 tablespoon at a time, stirring well. Continue to cook, while stirring frequently, until mixture is thickened. Pour into baked pie shell and cool.  Serve and enjoy.

Wednesday, May 31, 2017

Peanut butter, caramel instant oatmeal

In this day and age of the food networks hyping that you need to do fresh this and fresh that, some people have come to put down convenience foods. I am not one of those people. Ordinary people like me depend on convenience foods to put a good meal on the table, and there's nothing wrong with them. Those tv chefs are food snobs on camera, who probably chow down on all this 'bad' stuff they put down, when not on camera.

Having said that, this recipe uses a packet of microwavable oatmeal. I like the maple and brown sugar flavor. You don't have to get a name brand, as the store brand will do quite well. I myself get the Walmart store brand.

Now as to the caramel and peanut butter components of this recipe, I do go for name brands.

Hershey's caramel syrup,
and
Skippy creamy peanut butter.

Those are very important to the flavor of this. Using them, you can transform ordinary microwave oatmeal into something very yummy. So on to the recipe.

Caramel, peanut butter oatmeal

1 package of microwavable oatmeal, maple brown sugar flavor
Hershey's caramel syrup
Skippy creamy peanut butter
water

Take a microwave safe bowl and empty the contents of the oatmeal package in it. Add the water as listed on the packet. The ones I get say 2/3 cup of water. Stir, then put a 2-3 tablespoon size dollop of peanut butter into the middle of the bowl. Microwave as called for on the package; mine calls for 1 minute and 30 seconds. When you take it out of the microwave, give it a good stir, blending the melted peanut butter throughout the oatmeal. Then, drizzle over some of the caramel syrup, however much you like. Eat and enjoy.

If you wanted, you could also use chocolate syrup in this too. I use caramel because I can't have chocolate due to the caffeine in it.

Do you have a food question or a specific recipe request?
Click on the contact tab and send me a message.

Sunday, March 13, 2016

Check out Sunny's sweet and sour ribs


I love sweet and sour dishes, and this one sounds really yummy and simple too. I like adding the sliced ginger to the boiling water. I'll bet that adds tons of flavor. I also like the little pouch that she put her spices in. Would love to have some of those.

Just did a bit of research on the spice bags. The thing to shop for is refillable tea bags or spice bags or loose leaf tea bags. Anything for handling loose leaf tea would also work for your cooking spices as well. I've even seen some metal devices for loose tea that would work for cooking spices too. They're called tea balls.

In fact, here's a video that shows how you can make a very simple spice bag for your cooking spices.


Hope you enjoyed this post,
happy cooking. -- jd --

Saturday, February 20, 2016

No recipe cooking -- green beans

Hey there everyone! How are you doing?
I was just sitting here at my computer, and decided to put up a blog post here. It's the beginning of a series of posts that I've been thinking about for a while.

No recipe cooking

My mom cooked this way, and my grandmothers cooked this way; but I'm wondering - How many people still cook this way? Or know how?

So this is the first of a (hopefully) series of posts sharing my knowledge of no recipe cooking.

This is how my mom put meals on the table 7 days a week. And they were very tasty meals too. Stuff like vegetable soup, spaghetti, ribs, pork chops, chili, etc. About the only times we used recipes was on holidays when we wanted to make something special, and then it would only be about 1-3 recipes. Speaking of recipes, here's your first lesson in no recipe cooking:

green beans

Now for green beans, I like canned green beans the best. Frozen green beans just don't taste that good to me. So,

Take 2 cans of green beans and open them, then drain off all the liquid. You do not want to cook the green beans in the liquid they were canned in. For cooking liquid, add some water. I prefer bottled spring water, but tap water will be okay too.

Put your drained green beans in a pan, add enough water to barely cover the beans. Now for the seasonings:

salt
pepper
chopped ham

Stir this to mix in the seasonings, then add 2-3 pats of butter to the pan. Put it on low heat, and cook for 30-45 minutes, stirring occasionally.

Other seasonings ideas are:
your favorite spice,
your vinegar,
bacon bits,
ketchup,
mustard,
steak sauce,
sweet and sour sauce,
lemon juice.

And no, I didn't give any measurements for the seasonings. That's part of no recipe cooking. You don't measure much, but know just from looking or tasting, what is just right.

In closing, I leave you with this thought:
Err on the side of too little seasoning rather than too much. You can add more, but you can't take too much out.

Hope you enjoyed this post. Till my next one.
If you have a request for my next no recipe post, just comment below.

Sunday, April 27, 2014

The reviews are coming! And a Pumpkin Sausage Cornbread recipe too!

Are you folks ready?  Are you?

I know this blog isn't too busy, but I'm about to change all that.

I love collecting recipes, and I both admire and respect the bloggers who find and make those awesome recipes, and take the pics for their blogs.

But that's just not me.  I don't do that.  In the end sum of it, I'm a writer who can cook and loves recipes.  But I think I've finally found my niche in the food and cooking blogging world.

*** Cookbook reviews ***

ebooks to be more specific.  I have a kindle paperwhite, and amazon account, and a kindle for pc app, plus I can easily do pdfs as well.  I have a ton of free cookbooks that I've snagged off of Amazon, and I'm going to start reviewing them here in my blog.

So here's my opening cookbook review lineup:

Mastering Indo-Pak Cooking:  A must-have guide for every kitchen by Asim Iftikhar

The Sriracha Vegan Cookbook: 36 Sriracha Hot Sauce Recipes by Martha Drummond

So be looking for those.  In the meantime, I'll close with a recipe from an author friend of mine, Kris Austen Radcliffe.

Pumpkin sausage cornbread


1 package of Bob's Red Mill gluten-free cornbread mix
1 14oz can pumpkin
1-2 spicy sausages, your choice (we used Kentucky Bourbon)
1/2-1 tablespoon red pepper flakes

Follow the package directions, except substitute the pumpkin for the oil.  Bake in a preheated 12" cast iron skillet.  Make sure to generously grease with butter.

Pumpkin cornbread with Kentucky Bourbon Sausage, served with chicken and green beans for dinner and with poached eggs for breakfast.

Her hubby, Peter M Radcliffe says -- The breakfast was poaching eggs and wilting a little spinach, then plopping it on top of the cornbread. About as easy as it gets.

Monday, February 10, 2014

Special Valentine's Day Treat - Elegant Chocolate Covered Strawberries


Valentine's Day is coming up soon, and here's a super simple special valentine treat to make and share with your special someone or your family or for a party.  

Thursday, January 30, 2014

New feature! Recipes from Grandmother's Kitchen -- Chocolate Ginger Hazelnut Cake

Hey everyone!  I've found a neat website that doesn't mind if I share their recipes in my blog.  The website is -- http://grandmotherskitchen.org/ -- So on to the recipe --

Chocolate Ginger Hazelnut Cake

Ingredients

Cake
1/4 cup butter
1/3 cup molasses
1/2 cup brown sugar
1 cup all purpose flour
1 1/2 teaspoons ground ginger
1 teaspoon cinnamon
1 1/2 teaspoons baking soda
2/3 cup milk
1 egg, beaten
4 Tablespoons dark chocolate, chopped fine
Icing1/4 cup butter, at room temperature
1 1/2 cups confectioners sugar
1/3 cup cocoa powder
1 teaspoons vanilla
2 Tablespoons milk
Garnish
1/2 cup hazelnuts, chopped

Directions

  1. Preheat oven to 350 degrees F. Grease a 9x9 inch square baking dish.
  2. Put butter, sugar and molasses into a medium pot and stir over low heat until butter has melted. Turn off heat once butter has melted and stir in chocolate.
  3. Add flour, spices and baking soda to pot, and stir well.
  4. Add milk, egg and stir until smooth.
  5. Pour into pan. Bake 45-50 minutes, until tester inserted in middle comes out clean. Let cool completely.
  6. To make the frosting. In a medium bowl, cream the butter, confectioners sugar, and cocoa. Beat in vanilla, 2 Tbsp milk. If icing is to thick add more milk 1 teaspoon at a time.
  7. Spread icing over cake and garnish with hazelnuts to serve.

Original Chocolate Ginger Hazelnut Cake Recipe found at Grandmothers Kitchen Recipes.

Saturday, November 16, 2013

Jackie’s oven baked turkey

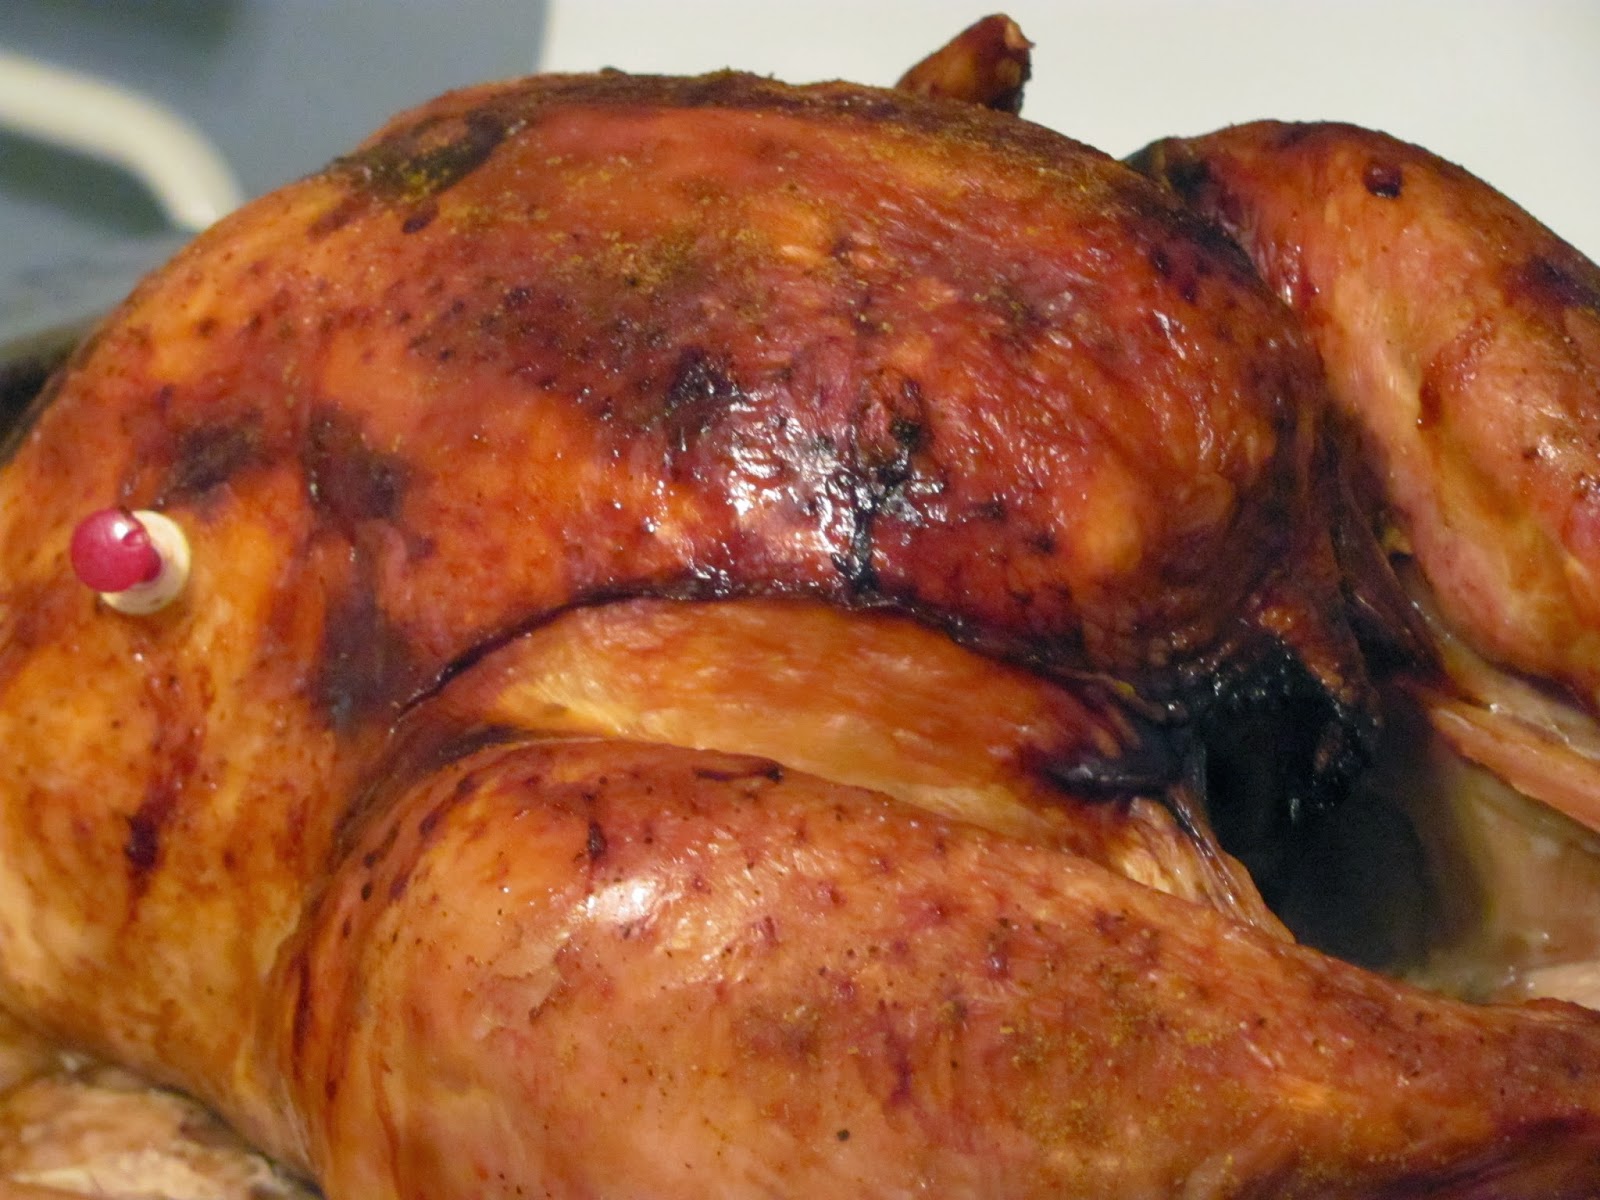
Here’s the turkey that I cooked:


1 Honeysuckle White young turkey, with the pop up timer, appx. 13-15 pounds


Now I had never cooked a turkey before.  My mom only cooked them at Thanksgiving, and I was usually busy with other things, food wise, at that time.  Also, now my mom was a great cook, but I never cared for her turkey.  Hubby and me, it’s just the two of us, so we usually had something else.

This year we were given the turkey, and so I thought, “Good time to try my hand at cooking a turkey, since it is free.”  I mean, I wouldn’t mind messing up on it if we got it for free.  So while the turkey thawed in the fridge, I formulated my plan.  Also, since we don’t have a lot of freezer space, I opted for going ahead and thawing it and cooking it.

The pan that I used.
Back in the good old days, a new stove would at least come with a broiling/roasting pan.  My roasting pan was given to me by my mom.  She had one from a newer stove, and when I got married, she gave me the broiler pan that came with her first stove.  It’s a beauty.  It’s old, and well used; stained and scratched - but boy does it cook.  And that is the pan I used.

photo taken after cooking turkey 
All the instructions say use a rack, but I didn’t have one; and didn’t have enough aluminum foil to try to make a substitute, so I opted to do without one.

Prepping the pan.
I gave the pan a more than generous coat of canola oil, then I poured a little bottled spring water in the bottom of the pan.  It’s been my experience that this helps out greatly with cleanup, and adds moisture to the meat you are cooking.

Prepping the turkey.
Make sure your turkey has been properly and completely thawed in the refrigerator.  You turkey package should have a chart telling how many days for what weight.  I did 4 days for a 13-15 pound turkey.

When I unwrapped the turkey, there was a lot of fluid in the package to drain.  What I recommend now, rather than what I did, is to poke a small hole in the bottom of the drumstick end of the turkey package.  Be sure you are over the sink when you do this, and drain out the liquid.  Be sure and have your other sink or counter lined with a clean, unused plastic garbage bag and paper towels; as a place to set you drained turkey. 

Remove the plastic wrap from your turkey.  Remove the neck and giblets which should be inside or in the front of the turkey.  We didn't use the giblets and tossed them, but I did opt to cook the neck in the same pan with the turkey; and since my pan was prepped, I put the neck in a corner of the pan.

I rinsed my turkey just under running tap water, and I let it run inside, and then dumped it out several times; till the water ran out pretty clear. 

Now most directions say pat the turkey dry.  I chose not to do this. 

I held it butt side down, over some plastic, and let any other water drip out; then I put it in my pan.  (Remember, I opted for no rack.)  The package instructions said to rub it with some oil, so I took a squirt bottle of oil that I keep, and rubbed the upper surface with a bit of canola oil.  Then I sprinkled it very generously with balsamic vinegar.  Next I sprinkled it very generously with worcestershire sauce.  Then I gave it a light sprinkle all over with curry powder.  Next came a light sprinkle with salt and pepper. 

While I was doing all this, my oven was preheating to 325 degrees.

Cooking the turkey.
Cooking time, both on the package and in my Better Homes and Gardens cookbook, was determined by weight.  Now your turkey should state the weight, but in case it doesn’t, you can do what I did if you have a digital scale.  Stand on the scale without the turkey, and record your weight; then stand on the scale with the turkey, and record your weight.  The difference between the two weights will  be the approximate weight of your turkey. 

The package said cook it 3-4 hours, and the cookbook said 4-5 hours.  I have a digital timer that has 2 timer settings, so I set one for 3 hours and the other for 4 hours.  So into the oven the turkey went, and the timer was started. 

After about an hour and a half or so, the top started getting pretty brown, so I followed instructions and put a tent of just regular aluminum foil over it.  And this should be loosely; not tightly wrapped.

I let it cook for about 3-1/2 hours total.  This bird had a pop up timer, and that had popped up.  I highly recommend these, as mine worked fine. 

Then we took it out, I took my pictures, and the eating commenced.  The neck turned out well too, and my hubby enjoyed it very much.


The eating and storing.
It turned out delicious, and looked like all those photos you always see of a turkey.  The skin was a golden brown, and had a slight crispy crackle when you first cut into it.  The meat was juicy and flavorful and tender.  My husband commenced to eating and foundered himself, and is asleep in the living room as I write this.  I really enjoyed watching him enjoy eating it.  He particularly loved the skin.

Since it is just the 2 of us, and this was just for us; not for a dinner or gathering - I went ahead and removed all the meat off the turkey and put it in plastic tubs in the fridge.  I put the skin and fatty parts in a separate tub, as hubby likes those and will eat them.  Then I took the remaining bones and put them in a ziplock bag in the fridge, because:  1-hubby might want to pick over them as he likes to do that; 2-save them for garbage day. 

And that's that.  My first turkey cooking was highly successful, and now we have yummy leftover turkey to munch on.  

If you are cooking for one or two, like me, there's no reason why you can't have your traditional turkey.  You can always freeze the turkey meat up for future meals.  One or two people can do a lot of eating off of one turkey.  

I hope you have a wonderful Thanksgiving holiday,
that your turkey and fixings turn out beautifully,
and from hubby and me,
we send all the best to you and yours!

Happy Thanksgiving!

Saturday, July 13, 2013

A most awesome pizza!

My husband and I went shopping yesterday, which is a chore in and of itself, and brought home the fixings for a most awesome and budget friendly pizza.  Since my husband went on disability, we pinch our pennies very closely.  So now let me tell you about this awesome pizza.

JD's Awesome Pizza

1 Walmart brand 4 cheese pizza (this will be your base)
1/4 pound of Hormel Virginia ham from the deli, sliced on 2
Oscar Mayer real bacon pieces (important that you get the real bacon and not those crunchy bacon bits)
1 small can of Walmart brand sliced mushrooms, very well drained
Shredded cheese (I prefer the 4 or 5 Italian cheese blend)

Cover your favorite pizza pan with non-stick foil (Reynolds Wrap makes it), and preheat your oven.  My package said 400 degrees, and that's the temp I used.  Put the frozen pizza on the pizza pan.  Take a paper plate and put a white paper towel on it, and lay your ham on it.  Microwave the ham for about 45 seconds.  This is to help remove the excess water, and prevent a soggy pizza.  Tear ham in pieces and put on pizza, next add the bacon pieces to suit.  Next you will add the mushrooms, but make sure you have thoroughly drained them.  What I did was leave the lid in the can after I opened it, and used that as a press to squeeze the excess water out.  Put mushrooms on pizza.  Then cover pizza with cheese to suit yourself.  I like to add a nice enough layer so nothing much shows through.  I baked mine at the package prescribed temperature of 400 degrees for 24 minutes.

It was wonderful!  The crust was golden brown around the edges, and nice and melted in the middle.  I slid it off the pizza pan and onto the pizza box, which had been opened and folded inside out, to provide a cutting place.  The crust was so nice and crisp and fluffy.  It made the most wonderful, crisp, crackling sound when I cut it.  And it tasted amazing!  The deli ham made a huge difference.  And microwaving the ham and squeezing the mushrooms eliminated the excess water and prevented that soggy crust syndrome I had often had when fixing a pizza this way.

Hope you enjoy trying this.  It is a very budget friendly way to fix a delicious pizza at home, and it can be customized to suit any taste.

Wednesday, November 14, 2012

guest post - Six Simple Side Dishes for Thanksgiving


Six Simple Side Dishes for Thanksgiving
By Suzanne Purewal

Thanksgiving is upon us. It is the time of year we gather together and remind ourselves how blessed we are and give thanks. But let’s face it – it is the food holiday.
This year will be my nineteenth year hosting Thanksgiving dinner. In the beginning, I made everything from scratch, just like my grandmother. I prepared and cooked for two days. I crafted stuffing from stale bread. I peeled, boiled and mashed Idaho® potatoes. I added enough dark brown sugar and butter to the yams to choke a horse. And then, I baked pies. On the big day, I cooked the turkey in a huge roasting pan, basting religiously every thirty minutes, and added or removed aluminum foil as needed.
Then finally the moment would arrive when we sat around the table as a family, with the television and phones off. I would breathe a sigh of relief after we finished praying. The work was done, and it was time to enjoy the fruits of my labor. Then I watched as my happy and thankful loved ones would devour the feast in twenty minutes flat. I always thought the length of time to eat the meal should be somewhat proportionate to the time and energy it took me to prepare it.
Alas, I could not force them to eat slower. So, now, I have someone bring the potatoes. I buy the pumpkin and apple pies. The turkey is cooked in a Reynolds® Turkey Size Oven Bag, and it bastes itself. And I do not feel guilty at all. Instead, I concentrate on whipping up different side dishes.
The six side dishes I am offering are simple to make. I have included three traditional choices — stuffed mushrooms, broccoli casserole and sweet potato casserole — as well as three healthier alternatives – sautéed mushrooms, roasted broccoli and baked sweet potatoes.
The stuffed mushrooms are perfect as a side dish or as an appetizer for any occasion. You can even make them a day in advance. I have been asked if extra virgin olive oil can be substituted for the vegetable oil. Yes, but it will totally change the taste of the mushrooms. So you might want to experiment ahead of time to see which you prefer.
The broccoli casserole is a variation of the green bean casserole recipe found on the side of French’s® French Fried Onions packages. I love broccoli. So one day I used that instead of the beans. I have not eaten a green bean casserole since.
I borrowed the sweet potato casserole recipe from a friend. If you do not want to spend the time peeling, cutting and cooking the sweet potatoes, you can replace them with Bruce’s® Yams (canned) and cook and mash them for the recipe.
You might be wondering why I included the healthier options. I was recently informed that the typical American consumes 3,500 calories during Thanksgiving dinner. That statistic served as my inspiration. However, if you do not want to rock the boat on Thanksgiving Day for fear of mutiny, these are quick and simple dishes to enjoy year round.


Broccoli Casserole

Ingredients:
1 can (10 ¾ oz.) Campbell’s® Condensed Cream of Mushroom Soup
¾ cup milk
1 tsp. Worcestershire sauce
1 tsp. ground black pepper
2 (9 oz.) pkgs frozen broccoli, thawed
1⅓ cups French’s® French Fried Onions

Directions:
Mix soup and milk, then add broccoli, Worcestershire sauce, black pepper and ⅔ cup onions in a 1½ qt. casserole.

Bake at 350°F for 30 minutes or until mixture is bubbling. Remove from oven. Stir mixture. Sprinkle with remaining onions.

Return to oven. Bake for 5 minutes or until onions are golden brown.


Roasted Broccoli

Ingredients:
1½ lbs. fresh broccoli
2 Tbs. extra virgin olive oil
Salt and pepper

Directions:
Preheat oven to 450°F. Cut broccoli into florets. In a bowl, toss broccoli with olive oil, salt and pepper. Spread florets out on a baking sheet. Bake for 20 minutes or until the edges are crispy.


Stuffed Mushrooms

Ingredients:
3 lbs. whole white mushrooms, small or medium
1 cup Progresso® Seasoned Bread Crumbs
½ cup grated Romano cheese
1 tsp. ground black pepper
1 clove garlic, minced
Wesson® Vegetable Oil to drizzle over mushrooms
Water to cover bottom of pan

Directions:
Mix bread crumbs, cheese, pepper and garlic in a small bowl. Set aside.

Remove and discard mushroom stems and wash mushrooms. Make sure you trim the cap so there is a well for the mixture. Place mushrooms in two (2) 9x12 glass baking dishes. Pour enough water in the dishes to cover bottoms.

Use a teaspoon (or small measuring spoon) to fill mushrooms with mixture. Make sure the mixture is slightly heaping. Drizzle oil over mushrooms. Check water level in the pan. Add more water if the bottom is not completely covered.

Preheat oven to 375°F. Bake for 30 minutes or until the topping is golden brown. The mushrooms will shrink during the baking process. If the mushrooms appear dry, baste them.
  

Sautéed Mushrooms

Ingredients:
1 Tbs. butter
1 clove garlic, minced
1½ lbs. mushrooms, sliced
Black pepper (to taste)

Directions:
Melt butter in frying pan over medium heat. Add garlic and sauté for 2 minutes.

Stir in mushrooms, cook for 5 minutes. Add black pepper to taste. Cook over medium heat for 10 minutes or until desired consistency is achieved.


Sweet Potato Casserole
Ingredients:
4½ cups cooked and mashed sweet potatoes
½ cup butter, melted
⅓ cup milk
½ cup sugar
½ tsp. vanilla extract
2 eggs, beaten
Crisco® All-Vegetable Shortening to grease dish

Topping Ingredients:
1 cup light brown sugar
½ cup all-purpose flour
⅓ cup butter
1 cup chopped pecans  

Directions:
Preheat oven to 350°F. Grease a 9x12 glass baking dish.

Mix sweet potatoes, butter, milk, sugar, vanilla extract and eggs in a large bowl. Spread mixture into the greased baking dish.

Mix brown sugar and flour in a small bowl. Cut in butter until mixture is crumbly. Stir in pecans. Sprinkle pecan mixture over the sweet potato mixture. Bake for 30 minutes, or until golden brown.


Baked Sweet Potatoes
Ingredients:
4 sweet potatoes (one per person)
4 Tbs. butter
4 Tbs. cinnamon

Preheat oven to 400° F. Pierce each potato several times with the tines of a fork. Place the potatoes on a baking sheet lined with foil. Bake 45 minutes or until tender.

Make a slit in the top of each sweet potato. Top each potato with 1 Tbs. of butter and 1 Tbs. cinnamon.

Jt's cranberry chutney

Here's a delightful holiday recipe for you all from an author friend of mine.  He is Jt Sather, and he is the author of the book:


How to survive when the bottom drops out


And here is the recipe that he shared with us:


Jt's Cranberry Chutney


Here's one of my favorites for thanksgiving!  Eat, then cry for not having had it sooner.

3 cups cranberries
1 cup raisins
1 T fresh grated ginger
2 cups sugar
1 teaspoon crushed red peppers

Drop three cups of cranberries and one cup of raisins into a pot of boiling water. Next add a tablespoon of fresh grated ginger, two cups sugar, and a teaspoon of crushed red peppers.  Reduce heat and simmer, stirring often until thick.

Saturday, October 13, 2012

Treating Dinner like a Dessert

We have a treat for you, a guest recipe post by
Genevieve Scholl
To find out more about Genevieve, check out her author's page on facebook:
https://www.facebook.com/pages/Genevieve-Scholl-The-Author/363728479105


<<<<<<<<<<<<<>>>>>>>>>>>>>>>


Combine dinner and dessert to create one delicious meal with my creation called Apple Pie Chicken Dinner.   I tried it as a pot pie and it was delicious!

Apple Pie Chicken Dinner

1 Chicken Breast- Chopped into Chunks
Sprinkle of Nutmeg
Sprinkle of Cinnamon
Dash of Sugar
One Whole Red Apple Chopped
Cup of Chopped Onions

The directions are easy. Throw all of the ingredients into a frying pan and sear until chicken is no longer pink. Goes very well with honey biscuits.

Wednesday, October 3, 2012

Murray's Cheese of New York comes to Louisville, Kentucky

Newsflash!  Fresh from my email!

Friends,
Below is the copied press release from Deena Siegelbaum, the Marketing Director for Murray's Cheese of 254 Bleecker Street, in New York, NY.  If you're in or around the Louisville area, you might want to check this out.

KROGER AND MURRAY’S CHEESE PARTNER TO BRING SPECIALTY CHEESE TO LOUISVILLE

HUBBARDS LANE KROGER TO OPEN FIRST MURRAY’S CHEESE SHOP

Louisville, KY. –Delicate, spreadable, velvety, tangy, how do you like your cheese? Whichever you prefer, chances are Murray’s Cheese has it! You can now purchase your favorite stinky cheese at the Hubbards Lane Kroger store! Through an exclusive partnership with Murray’s Cheese, Kroger is preparing to open the first Murray’s Cheese shop in the Louisville area. The shop is being added inside Kroger’s St. Matthew’s store, located at 291 North Hubbards Lane, Louisville, KY.

Murray’s and Kroger are hosting a grand opening celebration for the public this Sunday, October 7 from 1-4PM at Hubbard’s Lane Kroger, featuring cheese and beer pairings put together by Murray’s experts.
“Louisville is known as afoodie town and we are eager share this unique shopping experience with our customers and educate them on the best cheese for parties, snacking and trays,” said Murray’s Cheese Specialist, Vickie Oliver. “We are excited to offer our customers the chance to try new cheeses they will love and better versions of their favorites.”

Whether you are a cheese newbie or a connoisseur, we have the cheese for you. Try our selection of more than 175 cheeses from around the world, plus a wide selection of specialty items including crackers, dried fruit, and an olive and antipasto bar. Equally impressive is the staff of experts who have recently returned from their training at Murray’s New York City facility. They’ll happily offer samples and recommendations to help shoppers find just the right one for cooking or snacking at their next get-together.

“Murray’s is all about discovering cheese, we want to make cheese approachable to Kroger shoppers,” said Rob Kaufelt, proprietor of Murray’s Cheese and author of the Murray’s Cheese Handbook. “We know the people of Louisville love great food, so we are looking forward to introducing them to some of our favorite cheeses.”

The second Murray’s Cheese shop will open in the Highland’s Kroger, located at 2440 Bardstown Rd; on October 21st.

ABOUT MURRAY’S CHEESE:Founded in 1940 in the heart of New York City’s Greenwich Village, Murray’s Cheese began as a humble wholesaler of butter and eggs, but has evolved into a New York institution and what Forbes calls “The world’s best cheese shop.” Murray’s mission is to bring the best cheese selection to America.What is the Murray’s experience? It’s about sharing the cheeses (more than 150 varieties!) and many other artisan-made goods they find across the world. It’s about teaching customer’s cheese through tasting and introducing them to their cheese maker. The company is also one of the country’s top wholesale supplying fine restaurants, hotels and caterers. For more information about Murray’s please visitwww.murrayscheese.com

ABOUT KROGER:Kroger, one of the world's largest retailers, employs more than 339,000 associates who serve customers in 2,425 supermarkets and multi-department stores in 31 states under two dozen local banner names including Kroger, City Market, Dillons, Jay C, Food 4 Less, Fred Meyer, Fry's, King Soopers, QFC, Ralphs and Smith's. The company also operates 788 convenience stores, 342 fine jewelry stores, 1,124 supermarket fuel centers and 37 food processing plants in the U.S. Recognized by Forbes as the most generous company in America; Kroger supports hunger relief, breast cancer awareness, the military and their families, and more than 30,000 schools and grassroots organizations in the communities it serves. Kroger contributes food and funds equal to 160 million meals a year through more than 80 Feeding America food bank partners. For more information please visitkroger.com. Kroger’s Mid South Division is based in Louisville and it includes 162 stores in Kentucky, Tennessee, S. Indiana and S Illinois.
# # #